How to use Smilyanic Profiles?
So you've downloaded a Profile Pack?
If you have no idea what to do now, but you're willing to learn - you're on a right place to be!
Here we're going to go through the basic ''How To Use?'' of my profiles with Adobe Photoshop Camera RAW and Adobe Lightroom.
I am going to keep it short and simple!
That's a promise!
Let's start with ADOBE CAMERA RAW
Step 1.
Install your profiles using the installation guide provided in the zip of the Profile Pack you've downloaded.
Step 2.
Drag and drop or open a RAW image in Photoshop. A Camera RAW window will appear
Alternatively, if you're opening a JPG file, find ''Camera RAW Filter'' under drop down menu that reads ''Filter'', by selecting ''Camera Raw Filter''. A Camera RAW window will appear like when opening a RAW photo.
Step 3.
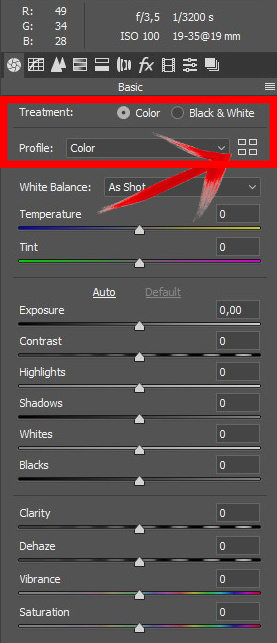
In order to find your Profile click on the ''4 squares'' shortcut, next to the Profile drop down menu. A Profile menu will appear listing all of the default Adobe Profiles including the ones you've installed.
Step 4.
Navigate to your Smilyanic Profile Packs and choose a desired look!
Step 5.
Using the Amount/Opacity slider you can control the strength of the effect, and by clicking on the star the Profile you wish will be put in the Favorites menu.
Step 6.
Once you chose a profile, and have set it's opacity
using the amount slider - press 'Close'. You will be returned to the
native Camera RAW window.
Step 7.
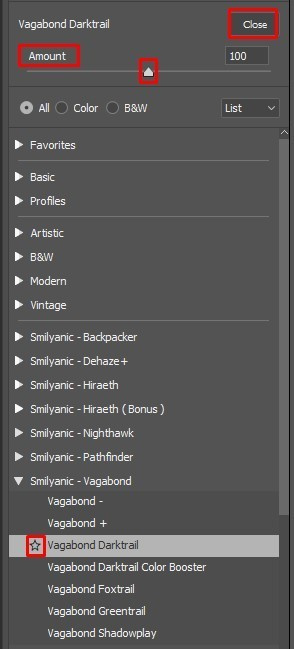
You may want to bring out the full potential of the image by further adjusting the colors, contrasts, shadows..etc., specially tailoring the look of your image. Luckily that's very easy!
Fine tune your photo, by adjusting the sliders highlighted in the blue box. In the orange box, you can still see the Profile you've chosen along with its 'Amount' settings.
The red box and the arrows point to the most important menus where you can also continue tuning the colors of your image. We're done!
Important notice:
Don’t forget to play with White Balance and Camera Calibration settings!
While using Profiles, the most drastic, and often the most interesting results you will get exactly by changing the values found within these two panels!
It's Lightroom Time!
Step 1.
Install your profiles using the installation guide provided in the zip of the Profile Pack you've downloaded.
Step 2.
Import your RAW or JPG photo(s) or choose the already imported images from the catalogue
You will find Profiles together with all the image and slider settings in the Develop Module of your Lightroom. This is where all the editing magic usually happens in Lightroom! :)
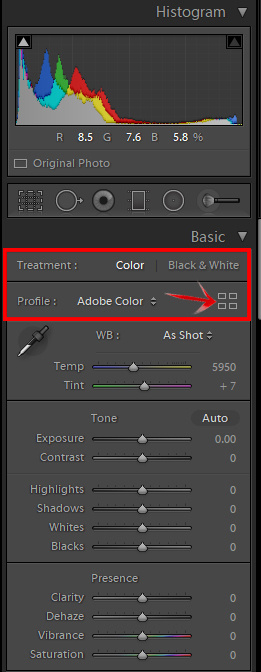
Step 3.
In order to find your Profile click on the
''4 squares'' shortcut, next to the Profile drop down menu. A Profile
menu will appear listing all of the default Adobe Profiles including the
ones you've installed.
Step 4.
Navigate to your Smilyanic Profile Packs and choose a desired look!
Step 5.
Now, that you've clicked on the Profile of your choice, an 'Amount' slider appears in the box above. Using the Amount/Opacity slider you can
control the strength of the effect.
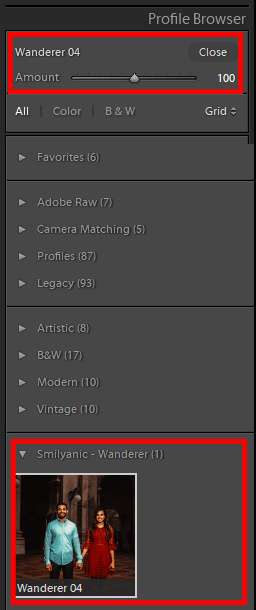
Step 6.
Once you chose a profile, and have set it's opacity
using the amount slider - press 'Close'. You will be returned to the
native Camera RAW window.
Step 7.
You may want to bring out the full potential of
the image by further adjusting the colors, contrasts, shadows..etc.,
specially tailoring the look of your image. In Lightroom that is extremely simple as everything is in the Develop module, available by simply by scrolling down.

Fine tune your photo, by adjusting the sliders highlighted in the
blue box. In the orange box, you can still see the Profile you've chosen
along with its 'Amount' settings that you can change from here as well.
The red box and the arrows point
to the most important menus where you can also continue tuning the
colors of your image. We're done!
Important notice:
Don’t forget to play with White Balance and Camera Calibration settings!
While using Profiles, the most drastic, and often the most
interesting results you will get exactly by changing the values found
within these two panels!